Wednesday, February 12, 2014

A Valentine Keepsake

Valentine's Day is just around the corner and I have been working on a couple of simple projects you can do with your child! This project will be made easier if you have a Cricut machine but it is NOT impossible to do if you don't have one. You'll simply be doing a lot of cutting and/or tracing by hand. 


Handprint Sign

Cricut Cartridges
Materials:
  • Tear Drops Cricut cartridge
  • Sweethearts Cricut cartridge
  • 12X12 scrapbook paper (background)
  • pattern paper (heart)
  • 2 different solid color papers (key & words)
  • Letter stickers (compliment background paper)
  • Acrylic paint (compliment background paper)
Instructions:
1. Using the Sweethearts Cricut cartridge, set the size dial to 6 1/2 and cut out the swirl heart from your pattern paper.
2. Using the Sweethearts Cricut cartridge, set the size dial to 4 and cut out the key from the key and lock from your solid paper; I chose black.
3. Using the Tear Drops Cricut cartridge, set the size to 1 1/4 and cut out all the letters for the saying "These ______ Hold Our ______ Forever"
4. Play around and rearrange the letters and pictures until you like the placement. REMEMBER to leave room for your child's hand prints and for the letter stickers to say "Hands" & "Hearts" .
5. Once you like the placement of everything, glue it all down first.
6. Paint your child's hand with the paint and place them on the paper where you have designated. As you can see, I chose to do them in the upper right hand corner.
7. Now place the stickers where you would like the words to be. I chose to add variation to my picture and placed the word "HANDS" vertical instead of horizontal.
8. I bought a 12X12 scrapbook frame from hobby lobby to finish it!


I forgot the "s" at the end of "HEARTS" OOPS!
Ideas if you don't have a Cricut:

Heart and key: I would find an image you like, print it out and cut around it. Then trace it onto the pattern paper of choice and cut and glue onto your 12X12 paper.
Letters: There are a couple ways you can do this; the first would be to find a stencil and trace and cut them out; the second could be to find letter punches and punch them out; a third could be to find an artistic font you like and print them on a complimentary paper and cut and glue each word or print the letters out and cut around each individual letter.

Tuesday, February 4, 2014

Healing a Severe Diaper Rash

For the first time since my daughter was born, which has been a year, she unexpectedly acquired her first SEVERE diaper rash. When my sweet angel was acting fussy throughout the morning I knew something was awry. Then when she awoke from her 3 hour nap screaming in pain I knew this seemingly simple rash had developed into more.

I noticed the rash a few days ago but it wasn't bad at. I treated it with my go-to A&D diaper cream. When it didn't go away, I treated it for a yeast infection by putting Lamasil on it. Still, it got worse!

When my daughter, who never cries (and those who know her, know that's not a lie), was screaming for over an hour, I called the on-call nurse for help. I was sure she would laugh at the fact I was calling about a diaper rash but when she heard my daughter screaming she jumped into action. She told me about the following treatment plan:

First:
Put about 2 tablespoons of baking soda into a luke warm bath and let the child soak for about 20 minutes.

Second:
Mix together the following ointments and slather it on her bottom: 


Vaseline
Neosporin (I used the one with pain relief)
A&D ointment (NOT cream)


I made a large batch of the ointment and stored it in a tub-a-ware.

My daughter immediately felt relief and was no longer in pain; on top of that she was able to move around again and the rash began to clear up. After 2 days of using the ointment after every diaper change the rash has healed up.

I will ALWAYS keep this ointment on hand and use it at the first sign of a rash!

I hope y'all find this useful in your adventures of parenting!

Wednesday, January 29, 2014

Guns or Glitter

Gender Reveal

I had the wonderful blessing and privilege of hosting a gender reveal party for my dearest and best friend Carolyn! Oh the ideas we threw around for the theme never ended, UNTIL, we came across the idea of Guns or Glitter. Both of our minds were going with all the ideas we could use, however, they were not on the same track. Carolyn's idea was pink and blue and mine was camo and glittery pink. After talking to, or rather persuading, Carolyn that pink and blue goes with the theme of "Blue or Pink what do you think?" I won out and the decorating began; CAMO and GLITTERY PINK!!!

I am a huge DIYer! In fact, you can always find me making something. If you can make it instead of buy it you will always save money; at least that is my philosophy and I will stick to it. (This is how I can convince my husband to let me go to hobby lobby so often)


Carolyn confined me to decorating and setting up to her kitchen and dining room. This isn't a very large space but I sure made the most of it.  


The guests signed this picture book (which would be used in the actual reveal) for the baby to have throughout his/her childhood. The sign reads:
 
GUEST SIGN IN!
Welcome!
We're so glad you came
We'd love to have you
sign your name,
And write perhaps a line or two
By which we can remember you.
Then when Baby Hall
 
has arrived
Our memories of this day will thrive
For when we look at it we'll see
Kind words from friends and family!


I made these pins for the mom, dad, and big-sister to be!
Guests would choose a ribbon pin (glittery pink or camo) and pin it to their shirt according to the gender they were hoping for. The sign reads: Once you have cast your vote, grab a pin and pin it to your shirt!

 
I had guests write their name on a piece of paper and place it in the corresponding jar for the gender they choose. I then held a raffle for the winning jar. The winner got a gift card to either Academy (boy) or Target (girl). The sign reads: write your name on a piece of paper and place it in the corresponding jar for your vote. A raffle will be held for the guest who guessed correctly! (each guest gets an entry!)
 
Then I had props for pictures for the guests to take. Once they had chosen the gender they are hoping for, they grabbed either a tiara or a gun and posed for a picture! The sign reads: Come take a picture, let us see which side you're wanting it to be.
 
To help guests vote, I talked to the mom-to-be and created a midwife tale chart so they could see which side the mom-to-be yields to.

 
This is the chalkboard drawing and voting for the guests so we could see what the majority thought!
Window fringe
 

Ribbon balls
 

The camo and glittery pink didn't end with decorations; I carried it over to the food and drinks as well. I had a pink lemonade and a green sherbert punch to incorporate into the drinks.

The Reveal

I got the idea from a friend whose gender reveal was unbelievable. It was so unique I knew instantly I wanted to do it for my best friend. Her reveal can be found on her blog The Kurtz Corner.
I gathered all the guests together and put them in a circle. I passed out small take out boxes and told them to not open them just yet. I also said that only one box contains the actual gender. I was going to read the book from the sign in (I Love You More). Every time I read the word "love" they were to pass their box to the right. After the story was over, everyone opened their box and the person with the gender was to shout out "IT'S A ...." the trick was, everyone had the gender in their box. Some how, it worked out to where the mom and dad- to- be shouted IT'S A BOY!!!! before anyone else. They were elated and overwhelmed!
Their bundle of joy will arrive in May and Jackson will be theirs to love on till the end of time!!! Congratulations Carolyn and Derrick!


Ribbon Wreath & Ribbon Balls

Ribbon wreaths and ribbon balls are fantastic and easy decorations for any occasion. They are not hard to make at all but they can be time consuming. I have made several ribbon wreaths and many ribbon balls.

Supplies (ribbon wreath)
  • Straw wreath form
  • 3 rolls of wide satin ribbon
  • 12 rolls of ribbon in varying color and patterns (not wide or skinny ribbon)
  • ruler
  • straight pins for sewing    
  • scissors
  • hot glue

You will need to unwrap the straw wreath from its plastic (it will make a mess so caution). Now tightly wrap the wide satin ribbon around the wreath form. Pin at the beginning and every so often throughout the wrapping to ensure it stays in place. You will have a little extra left over and this will be used to hang the wreath.

Cut your other ribbon into 4" or 5" strips


Now start by creating a loop with your strip; place it on the wreath form and using the straight pin, push it in. Using this same technique, place another loop next to the one already on the wreath alternating colors/patterns. To make the wreath look full, you will need to rotate the ribbon so it fits around and next to the piece/s that are already there. Make sure you go far enough to the top and on the inside so there are no gaps. The picture will do better explaining than my words.


Once you have pinned all of your pieces of ribbon, you are
ready to place the hanger ribbon. Use the left over satin ribbon and measure how long you want it to hang by folding the piece in half and holding it up to your wreath. Using hot glue, affix the ribbon onto the back of the wreath.
 
 
Now hang it on your door and enjoy!!!!

Supplies (ribbon ball)
  • Medium Styrofoam ball (white)
  • 4 rolls of ribbon in varying colors and patterns (not wide or skinny)
  • scissors
  • straight pins

The technique is the same as the ribbon wreath; the only difference is, the entire ball will be covered.

Start by creating a loop with your strip; place it on the ball and using the straight pin, push it in. Using this same technique, place another loop next to the one already on the wreath alternating colors/patterns. To make the ball look full, you will need to rotate the ribbon so it fits around and next to the piece/s that are already there. See the above picture for better explanation.

Once the ball has been covered, you may choose how to display it. I've put a dowl rod into the ball and placed it in a container for decorations for parties; I have also hot glued a ribbon loop to the top to hang.  You could also use smaller Styrofoam balls to display in a glass container for decoration as well. The possibilities are up to you and your imagination.

Making Homemade Baby Food

Well this is long overdue but I suppose I might as well post it as I have so many friends and family members having babies. My daughter is now 1, and my how the time flew! I knew I would want to make homemade baby food when the time came just because I enjoy cooking and I thought, key word is thought, I would have the time. I quit my job as a middle school teacher to become a stay at home mom. Because I always have to stay busy I thought making baby homemade baby food would be a fantastic idea. I was right, it was! However, do not make the mistake, it is time consuming in a sense. If I was a working mom, like so many women out there, I would have chosen to spend my "off" time doing something other than standing in the kitchen pureeing food. With that said, I will dive into the basics of homemade baby food and how it has helped my toddler transition to adult table food.

I started by finding the best website to help with basic cooking methods of vegetables and fruit. After much research I came across this website. It has so much good information, ideas, and basic cooking instructions for vegetables and fruit. I baked or steamed everything and then pureed them. I then froze them in ice cube trays and popped them out and stored them in freezer bags. They can store up to 3 months; 3 cubes = 1 jar of baby food.

I started with the less sweet vegetables and moved my way up to the fruit. I steamed green beans, peas, squash, zucchini, carrots, and all the fruit (except bananas). I baked sweet potatoes, butternut squash, and acorn squash. I put all the meat, chicken, turkey, pork loin, and rump roast, in the crockpot to cook all day so it would get extra tender. I would spend about 2 hours cooking, pureeing and freezing everything. This doesn't sound like much time but as a stay at home mom, I had that time. For those who only have the weekends to spend with their precious children, 2 hours can be a decade. That is why I would simply buy baby food if I was a working mom.


The perks of making homemade baby food is the ability to change the consistency to gradually lead your baby into thicker more chunky foods. At 7 months, my daughter was chewing smaller pieces of her fruits and veggies and eating table foods. By 9 months, we no longer made baby food and she only ate what we had at each meal. The older my daughter got, the more she was wanting something different. So I started to mix the foods together and try new and different foods. Please talk to your pediatrician and make sure this is acceptable for your child.  This may not be the case with your little one so do what is right for him or her.

Now that my daughter is eating table foods, I simply bake all my veggies in slices and then cut them into cubes and freeze them. Now they are finger foods made just for my sweet toddler.

Things I Learned

My daughter preferred to eat the green beans and peas from a can instead of fresh or frozen. I just bought the no salt added cans.

When it was time for finger foods, I found that the frozen slices of carrots, squash, and zucchini, along with the frozen broccoli and cauliflower were easy when steamed in the Ziploc steamfresh bags. The bags are easy to use and really quick. It allowed me to put only the amount my daughter would eat for that meal in and steam in just a couple of minutes in the microwave. Then I lightly seasoned it in the bag and served it to her. She loved it and it wasted no time. I would choose to steam veggies in this bag if I lacked the time to steam it in a pot.

I had a baby bullet that I used to puree which was excellent. However, I received it as a gift and wouldn't have spent the money on it. Instead a blender or a food processor works just as well if not better. Try those instead.

If your little one won't eat some veggies, try steaming them in the microwave in apple juice instead of water. It will sweeten it and keep the nutritional value you're looking for.


I loved every minute of making baby food and will do it again for my future children. I hope you will enjoy this adventure and don't put too much pressure on yourself. Children are a blessing and enjoy every minute with them!

Wednesday, December 4, 2013

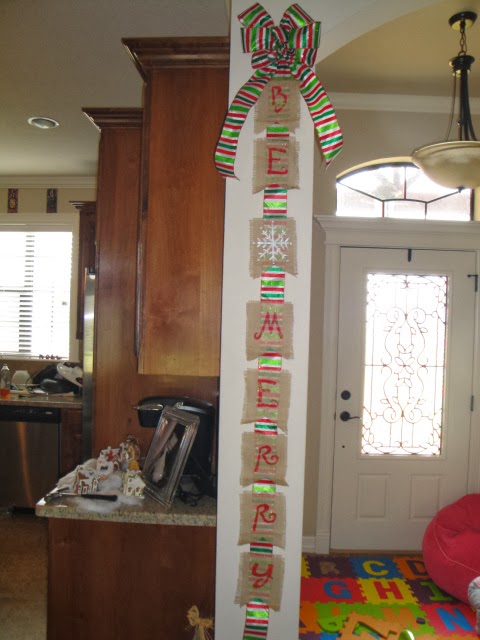
Christmas Burlap Banner


It's been a while since I've been on my blog! I have to thank my absolutely wonderful daughter for that! I spend more time with her because, as every mom knows, they grow up so fast!!

With that said, I, along with many other bloggers, LOVE Christmas and the many DIY projects that go with it!!!

With inspiration from Pinterest I created my own burlap banner!

GORGEOUS!
(At least I'm quite proud of it!)


Here is what you'll need:
1/2 yd of burlap (easier if you don't by it by the roll)
Letter stencils (unless you want to do it by hand)                                                           
Acrylic Paint
Circle sponge brush
small paint brush
Christmas ribbon
Ruler
Hot glue
Permanent marker
Scissors
Paper plate
 
Step 1: Use a ruler and permanent marker and create 5X7 rectangles on your burlap. I needed 7 rectangles for the letters and 1 for the spacer. Your banner can say whatever you want! Get creative; it is Christmas after all!!) Because I cannot measure the same every time with a ruler (don't ask me why), I used a 5X7 card and traced around that with my permanent marker.


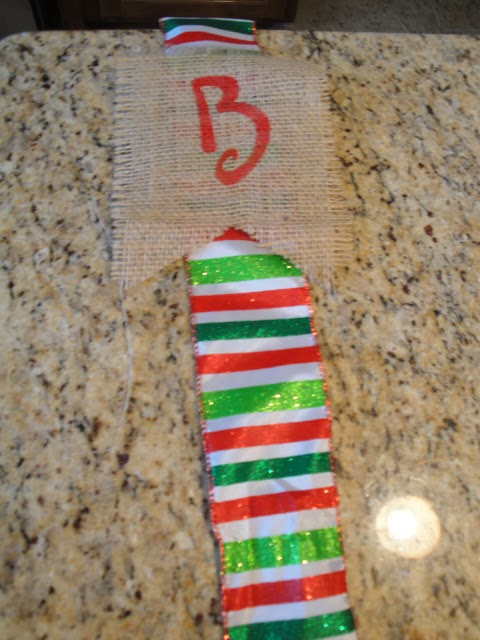
Step 2: Use your ruler and along the bottom (short side) mark 2 1/2 inches in and then 2 inches up from that point. Now going from the corner to the dot inside the rectangle, create a triangle. See the picture below :)

 
Step 3: Cut along the line creating banner pieces.


Step 4: Now you are ready to paint your letters. I recommend placing them on a piece of paper just in case the paint bleeds through. I chose for my banner to say "BE MERRY". Center the letters from my stencil pack on to each piece a burlap. Using the circle sponge brush/dabber, dip it in paint then dab onto the stencil. NEVER make a brushing stroke as it will cause you to go outside of the lines on the stencil!! The more paint you use, the darker the letters will be. FYI, it will not take long for the paint to dry.


Step 5: Now paint your spacer using a regular paint brush. I chose a snowflake to go between my words. I didn't have a stencil but I simply Googled snowflake and got my idea from there. It isn't perfect, but you can clearly see it's a snowflake; so I'll take it!!!


Step 6: Once your burlap pieces have dried (it doesn't take long), lay out your ribbon. You will need to leave about 3 inches at the top to add your bow so it doesn't cover up your letter, and a tail at the end. Using your burlap pieces, choose how you want your spacing. I wanted less space between my letters and more between my words. Once they are laid out, hot glue the burlap to the ribbon. Glue on each side of the ribbon instead of in the middle. It will make it look nicer. 


Step 7: Cut your tail so that it has a beautiful triangular point cut out of it!
 
Step 8: Make your bow using the left over Christmas ribbon. You may choose to make your bow as large or as small as you would like. I used THIS YouTube video to help me!
 
Step 9: Hot glue your bow on to the top of the banner. (This is why you need to leave about 3 inches of ribbon at the top)
 
Step 10: Create a loop to hang from a door hanger if you so choose. My banner was too long so I chose to hang in on the wall. To create the loop, just cut a 4 inch piece of ribbon. glue one edge on to the back of the top piece of ribbon. Then loop it around and glue the other edge, creating a loop. The loop should be vertical so it can hang on the hook.


Now you are ready to display your BEAUTIFUL banner around your home!!!


Sunday, April 7, 2013

Crockpot Cream Cheese Chicken Chili

Who doesn't like Crockpot cooking?!? When you are a busy mom, or simply a working woman or man at that, a Crockpot meal is always a plus! This chicken chili is delicious, easy, and a crowd pleaser.

I found the recipe through Pinterest which was linked to Land O' Lakes webpage. I followed the modified  recipe given through Pinterest which does not have a link to the changed recipe. It's very easy, and I was able to freeze the leftovers for a later date!

Ingredients:

2 Frozen chicken breasts
1 can of Rotel
1 can corn, do not drain
1 can black beans, drained and rinsed
1 package Ranch dressing mix
1 Tbs Cumin
1 Tbs Chili powder
1 Tbs onion powder
1 8 oz package cream cheese


Directions:

Place the frozen chicken breasts in the bottom of the Crockpot, then add the remaining ingredients and stir. The cream cheese will remain in the brick until everything has warmed up and then it will begin to melt. Cook on low for 6 hours. Stir before serving; this will shred the chicken.

Serving Suggestion:

I put tortilla chips on the bottom, spooned the chili on top, sprinkled with shredded cheese and green onions.

Very easy and delicious!!

I hope you enjoy it as much as my family did!

Welcome to the Mortashed Family!!

I was recently married in February of 2011 and am enjoying newlywed life. My husband and I have welcomed a beautiful baby girl, Adalynn, into our family in January of 2013. She will be the inspiration behind many of my crafty projects. Thanks to my hardworking husband, I have become a stay at home mom while I put my teaching career on the back burner. Being a mom is extremely rewarding and wouldn't trade it for anything. I love crafting, baking, and cooking as a lot of others do as well. My craft projects will be diverse but simple to follow as I have limited time with a baby on hand. I hope you enjoy these Do It Yourself projects and delicious dishes and baked goods!