Thursday, February 5, 2015

Candyland Birthday Party

Here we go again!!! 

My beautiful daughter turned 2 and in true Mortashed fashion, I threw an over the top party! The theme this year, CANDY LAND! There were so many ideas that I was a bit overwhelmed. I put all my ideas on paper and began to give them my own twist. I work on a budget of $500 for the entire party so I give myself no more than $200 for decorations. So when I found ideas on Pinterest, I had to figure out how to make them on a fixed budget. Below, you'll see my decorations along with descriptions of materials used. YES, I did make it under budget!


CANDY LAND PARTY!!!


Tables

Every table had a different color table cloth. I wanted it to appear as a rainbow; so I bought the cheap plastic table clothes from hobby lobby. Then I chose a polka dot wrapping paper as the runner down each table. Each table had a main centerpiece and then two smaller ones around it. Each table had the same center piece, just in varying colors. 


I made the tissue paper ball by layering 5 different colors of tissue paper together. I then glued them onto a small dowel rod. Then my fantastic husband cut a cube of wood to glue in the bottom of the pails (I got various color pails from hobby lobby) and drilled a hole to stick the rod in. I filled the pail with rice to weigh it down and topped it off with gumballs. (Less gumballs=less money)

I took a simple mason jar filled it with dyed rice to give it the appearance of sprinkles. Honestly, can you imagine the cost if I were to fill 12 mason jars with sprinkles?! YIKES! I cut the #2 out of card stock with my Cricut. I saw an idea using candles but that would add up since I put a #2 on both sides of the jar. So, to save money I used paper. I then taped it into the jar prior to filling it up with rice. 

Here is the overall look of the tables. I had a total of 5 tables, though I planned for 6. 


CANDY and DESSERT BUFFET

There can't be a candy land party without a candy buffet. So I did one more and added a dessert buffet too! To add pizzazz to the tables, I created ribbon fringe to the edges of the tables to make them stand out. After all, this is the theme of the party. To create the different levels in the buffet, I wrapped boxes in white wrapping paper (I just turned wrapping paper I already had upside down so I didn't have to add to my cost). I threw and extra table cloth over the boxes to hide them. I found that stapling the fringe to the table cloth was the best method in holding it up. Candy: I got candy the day after a major holiday so it was on sale for really cheap. I had a mix of chocolate and sour; blow pops, starbursts, nerds, ring pops, Hershey kiss mix, small Hershey bars and KitKats. Dessert: birthday cheesecake, cake batter dip with animal cookies, Trix crispy treats, frosted sugar cookies, dipped strawberries, dipped pretzels, dipped marshmallows, and the Mother's frosted animal cookies with sprinkles (you know the iconic pink and white ones with sprinkles?)


"Grab a bag, take some treats, enjoy the sugar, life is sweet!"


The Walls

My Husband had a CRAZY idea to paint the back wall in our garage in chalkboard paint. His reasoning? It would be cool to see the kids write and draw on it for the party. My initial reaction was disbelief, but I warmed up to the idea and we did it. The end result was perfect. I was able to write my daughter's name and then decorate around it. I created pieces of candy using my Cricut by cutting large circles out of varying colors and swirls. Then I made lollipops using dowel rods and varying colored circles. I created a sweet shoppe sign for my daughter and the letters to go above the door. I wanted the candy land characters so I printed them on my computer and colored them. The most impressive wall decor was the number two I did out of pictures over the past year. I received a lot of compliments on it. 


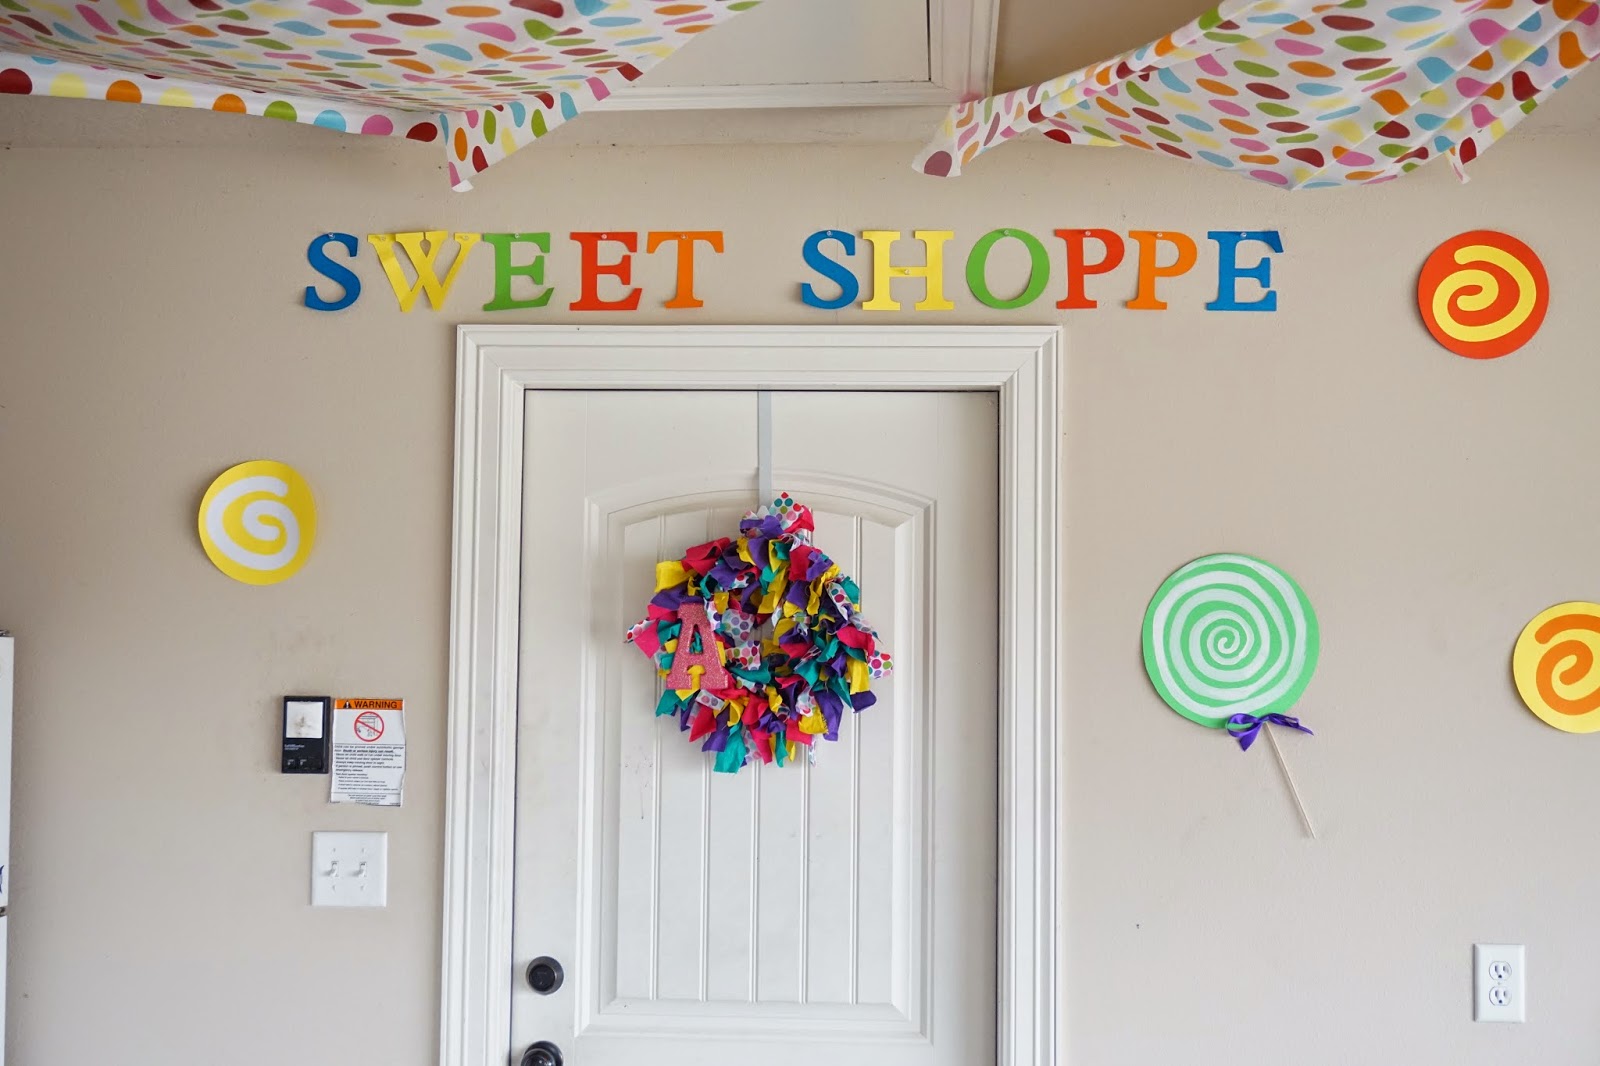
The wreath is a fabric wreath with a glitter A

The finished product


Outside Decor

I did a lot of decorating outside in the yard as well. I created 40 large lollipops to line the driveway and walkway. I got large foam boards from Hobby Lobby, painted them and added a survey stake so they could be driven into the ground. I had wooden art decor made for Christmas which easily doubled as decorations for the party. Lucky for me, I love the sweet shoppe theme so I didn't have to spend any extra on this. I had the candy land castle made for the party but of course it will be used year after year for Christmas because it is made out of wood. 


Miscellaneous Party Items

I bought the plates and napkins from Hobby Lobby. I also made silly straw lollipops as thank you's to send home. The oh so clever saying I came up with was "Thanks for 'silly'brating with me!"


On My Honor Book Review

A New Type of Post

I've decided to try something a little different with this post. To say I LOVE to read would be an understatement. As a former  English teacher (now a stay at home mom),  I read books/novels a little different than most. While I read, the wheels in my head tend to turn, and I think of activities and questions as well as vocabulary to go along with the book. Not all books I read lead to this thinking however. When I start a novel, I quickly decide if this would be a book I would read and teach with my class.

Some posts will contain the activities and questions I create with the novel and others will simply be a book review.
*** All opinions and activities are my personal thoughts and not tied to any academic frame***

On My Honor 

Author: Marion Dane Bauer

Book Review

On My Honor is a fantastic and quick read. It spans only over a day thus making it ideal for a quick read with a class. The main characters, two boys, Joel and Tony spend all their time together. Despite growing up across the street from one another, they are complete opposites. Joel, I seemingly reserved individual, tends to butt heads with Tony, a daredevil of sorts. They have decided to take a bike ride to Starved Rock Park. Tony wants to climb the bluffs, yet Joel is a bit nervous knowing how dangerous that is. On their ride to the park, they stop at Vermillion River. Despite everything Joel knows and has been told, he goes against his better judgment and jumps in the river along with Tony. It quickly escalades into a fight for life as Joel realizes Tony cannot swim. The novel takes the reader along the journey of Joel fighting his conscience.

 My Thoughts: This book was a quick read. In fact, I finished it in a couple of hours. It may be a touchy subject for some people and/or students so it may need to be thoroughly thought out before teaching. However, I think it is a subject worth touching on. Because it is a book with the main characters being boys, it may appeal to the male student a bit more than another book. I would definitely recommend this book!

Activities For The Classroom

I have attached 3 documents a teacher may find useful when teaching this novel. They are completely my frame of thinking and are not tied to any academic frame. I used my knowledge as a teacher and what I would use in my own classroom. Please use at your own discretion and feel free to make any changes to the documents as you deem necessary.


Monday, July 28, 2014

Toilet Paper Tube Dragonfly

I'm always looking for fun and easy crafts to do with my daughter that use materials I already have around the house. This is a very easy craft and versatile! Though I used my Cricut machine to cut out the dragonfly pattern, you may use an image from the internet as a stencil.

Materials:

- Toilet paper tube
- Dragonfly pattern (Cricut machine "create a critter" OR google images)
- A piece of scrapbook paper 4"X7"
- Googly eyes
- Tape
- Glue


Directions:

1. Cut out your dragonfly. I used my cricut machine but you can simply find a dragonfly image on google and use that as a stencil. Make it easy on yourself!
2. Measure your scrapbook paper to be 4 inches wide and 7 inches tall.
3. Tape the scrapbook paper around the dragonfly
4. glue the wrapped toilet paper tube onto the body of your dragonfly
5. Glue the googly eyes to the dragonfly.


I allowed my daughter to choose her paper, press the buttons on the Cricut, tape, and glue so she would be involved in every aspect of the project. She enjoyed it and it was simple for her to execute!!!

Monday, June 9, 2014

Father's Day Canvas

Looking for a simple Father's Day craft for a little one to do? This is exactly what you you've been looking for. My daughter, who is 1 1/2, loves finger painting! In fact, she asks to do it all the time. So I thought, why not incorporate her love of painting into a gift for her daddy. We created a canvas he can hang beside the bed.


MATERIALS:

8x10 canvas
finger paints
1 3/4" wooden letters (to spell what you want)
hot glue
picture hangers (found in the framing section of Hobby Lobby)


INSTRUCTIONS:

1. Finger paint the canvas and allow it to dry.


2. Tape the wooden letters to a piece of paper and drop finger paint along each wooden letter. Then finger paint the letters and let dry.


3. Pull the letters off of the paper and arrange on the canvas as desired.
4. Hot glue the letters down on the canvas and let dry.
5. Add the picture hanger to the back of the canvas and you are ready to deliver your gift.


You may also use acrylic paints, but my little one tends to paint everything around her including herself so acrylic paints were a no go for us!!

My daughter made 2 different canvas', one for her Daddy and the other for her Papawl!

Friday, June 6, 2014

Fishing Baby Shower

I was honored to host a baby shower for my dearest friend! Once the gender was revealed as a BOY, the theme was a no brainer!!! The family chose FISHING because that is the dad-to-be's favorite hobby.

I started with my go to idea starter, pinterest. After creating a board and getting my creative juices flowing, I began. This post shows everything I did to transform this theme in to the mom-to-be's dream of a baby shower!

THE BEFORE

A BLANK CANVAS
 

DECORATIONS

The table decorations were simple. I used 2 shades of blue plastic table cloths and alternated between the 4 tables. There was a square fabric topper in the middle. I had a tree trunk cut and used that as the base to hold mason jars that were filled with blue water and bobbers.


Along the wall I had put up different size circles cut with my Cricut from different shades of blue cardstock. Then I use Crepe paper and twisted it along the base to look like seaweed.


Along the ceiling, I draped blue cellophane to appear like waves or water. Then I hung painted paper lanterns to look like bobbers. (I took plain white lanterns and painted the base red). Then I hung paper fish in various primary colors that I cut with my Cricut.
 
The sign in table had a couple of simple diaper cakes, the baby book, pictures, and ribbons for the people to be honored.


I made a decomesh wreath for the door and hung fish fringe from the door way.
 

I made a sign to direct guests to the baby shower and a fishing doc to set the presents on.


FOOD

Each element of the food table (with the exception of the sandwiches) were fishing themed. The meat and cheese tray had the pieces cut into fish, the treats ranged from reels and rods, to bait and bass. The cake was done by a local bakery called Cake Junky. The cupcakes and the bobber cake pops were done by a local bakery in Temple, Texas.
 
The drinks were suppose to be "Lake Water" and "Ocean Water" but due to my lack of knowledge in the Kool-Aid industry, I bought fruit punch in a blue packet. I assumed it would come out blue but it was red, so I just said a shark attack had just occurred in the water!


THE GAMES

There were several games the guests played. One was break your water in which each guest was given an ice cube with a plastic baby in it and they had to watch it throughout the shower and once their baby was free from the ice they shouted "My water broke!" and they got a prize. Another game was Price is Right in which I chose baby items and had them displayed and the guests had to write their best guess as to the price of each item; they totaled their sheet and the person closest without going over won. Another game was guessing what the mom-to-be hoped the baby would have as far as features and personality goes. The final game was played during gift opening. Prior to the gifts, each guest wrote down a number on a piece of paper guessing how many times the mom-to-be would say the word "baby"; then while the mom opened presents we counted how many times she said "baby" and the person who guessed the closest won. The prizes for all of the games were small hand sanitizers from Bath and Body Works.
 
The price is right set up


THE AFTER!!


Welcome to the Mortashed Family!!

I was recently married in February of 2011 and am enjoying newlywed life. My husband and I have welcomed a beautiful baby girl, Adalynn, into our family in January of 2013. She will be the inspiration behind many of my crafty projects. Thanks to my hardworking husband, I have become a stay at home mom while I put my teaching career on the back burner. Being a mom is extremely rewarding and wouldn't trade it for anything. I love crafting, baking, and cooking as a lot of others do as well. My craft projects will be diverse but simple to follow as I have limited time with a baby on hand. I hope you enjoy these Do It Yourself projects and delicious dishes and baked goods!