Valentine's Day is sneaking up and here is a quick and easy Valentine you can do for a school exchange or just because you want to give a little something to a few friends!
Materials:
- 5 1/2 in square piece of colored paper
- small white piece of paper
- black piece of paper
- small orange piece of paper (easy if it's a square)
- Glue stick
- pencil
- medium circle shape (to trace)
- smaller circle shape (to trace
- scissors
- individually wrapped candies
Instructions:
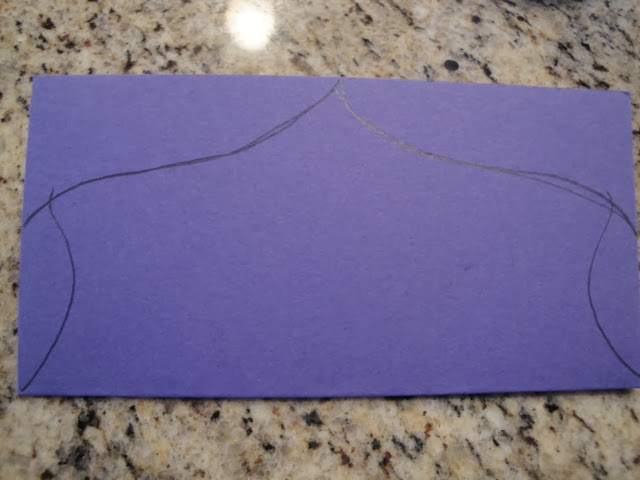
1. Fold your 5 1/2 square piece of paper in half. With the open half pointed away from your body draw a bracket: { just like the picture below
2. Now along the shorter side of the folded piece of paper, draw a semi-circle; do the same on the opposite side. See picture below
3. Now cut along your lines so the finished piece looks like the below picture.
4. Using this as a template, create as many owl faces as you desire.
5. Using the orange piece of paper, you will create a small (in fact it might actually be tiny) triangle. This will become the beak. I made it easier on myself and simply cut off the corners. (See picture below) If you choose to take this route, you will need several pieces of orange paper.
6.Use your 2 size circle items for tracing, and trace 2 of the medium circles on to the white paper, and trace 2 of the smaller circles on to the black paper. (See picture below)This will become your eyes. Cut out the circles.
7. Glue the beak on first, then the eyes.
8. Now you are ready to glue the candy inside. Open up the face, and place a lot of glue on one side. Lay the candy on top and then close the face and press down making sure to seal it so that it will remain closed.
9. On the back, you can write whatever saying you like that pertains to owls: "Whoooo _______". I chose to write "Whoo's the sweetest?"
Happy Valentine's Day!
Enjoy your simple Valentine!!!
Valentine's Day is just around the corner and I have been working on a couple of simple projects you can do with your child! This project will be made easier if you have a Cricut machine but it is NOT impossible to do if you don't have one. You'll simply be doing a lot of cutting and/or tracing by hand.
Handprint Sign
 |
| Cricut Cartridges |
Materials:
- Tear Drops Cricut cartridge
- Sweethearts Cricut cartridge
- 12X12 scrapbook paper (background)
- pattern paper (heart)
- 2 different solid color papers (key & words)
- Letter stickers (compliment background paper)
- Acrylic paint (compliment background paper)
Instructions:
1. Using the Sweethearts Cricut cartridge, set the size dial to 6 1/2 and cut out the swirl heart from your pattern paper.
2. Using the Sweethearts Cricut cartridge, set the size dial to 4 and cut out the key from the key and lock from your solid paper; I chose black.
3. Using the Tear Drops Cricut cartridge, set the size to 1 1/4 and cut out all the letters for the saying "These ______ Hold Our ______ Forever"
4. Play around and rearrange the letters and pictures until you like the placement. REMEMBER to leave room for your child's hand prints and for the letter stickers to say "Hands" & "Hearts" .
5. Once you like the placement of everything, glue it all down first.
6. Paint your child's hand with the paint and place them on the paper where you have designated. As you can see, I chose to do them in the upper right hand corner.
7. Now place the stickers where you would like the words to be. I chose to add variation to my picture and placed the word "HANDS" vertical instead of horizontal.
8. I bought a 12X12 scrapbook frame from hobby lobby to finish it!
 |
| I forgot the "s" at the end of "HEARTS" OOPS! |
Ideas if you don't have a Cricut:
Heart and key: I would find an image you like, print it out and cut around it. Then trace it onto the pattern paper of choice and cut and glue onto your 12X12 paper.
Letters: There are a couple ways you can do this; the first would be to find a stencil and trace and cut them out; the second could be to find letter punches and punch them out; a third could be to find an artistic font you like and print them on a complimentary paper and cut and glue each word or print the letters out and cut around each individual letter.
For the first time since my daughter was born, which has been a year, she unexpectedly acquired her first SEVERE diaper rash. When my sweet angel was acting fussy throughout the morning I knew something was awry. Then when she awoke from her 3 hour nap screaming in pain I knew this seemingly simple rash had developed into more.
I noticed the rash a few days ago but it wasn't bad at. I treated it with my go-to A&D diaper cream. When it didn't go away, I treated it for a yeast infection by putting Lamasil on it. Still, it got worse!
When my daughter, who never cries (and those who know her, know that's not a lie), was screaming for over an hour, I called the on-call nurse for help. I was sure she would laugh at the fact I was calling about a diaper rash but when she heard my daughter screaming she jumped into action. She told me about the following treatment plan:
First:
Put about 2 tablespoons of baking soda into a luke warm bath and let the child soak for about 20 minutes.
Second:
Mix together the following ointments and slather it on her bottom:
Vaseline
Neosporin (I used the one with pain relief)
A&D ointment (NOT cream)
I made a large batch of the ointment and stored it in a tub-a-ware.
My daughter immediately felt relief and was no longer in pain; on top of that she was able to move around again and the rash began to clear up. After 2 days of using the ointment after every diaper change the rash has healed up.
I will ALWAYS keep this ointment on hand and use it at the first sign of a rash!
I hope y'all find this useful in your adventures of parenting!
Welcome to the Mortashed Family!!
I was recently married in February of 2011 and am enjoying newlywed life. My husband and I have welcomed a beautiful baby girl, Adalynn, into our family in January of 2013. She will be the inspiration behind many of my crafty projects. Thanks to my hardworking husband, I have become a stay at home mom while I put my teaching career on the back burner. Being a mom is extremely rewarding and wouldn't trade it for anything. I love crafting, baking, and cooking as a lot of others do as well. My craft projects will be diverse but simple to follow as I have limited time with a baby on hand. I hope you enjoy these Do It Yourself projects and delicious dishes and baked goods!


